Your Cart is Empty

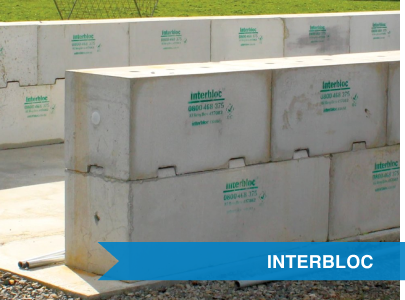

The Interbloc precast wall system is designed with simplicity in mind, because simple systems are fast to learn and easy to use. The blocks stack together with ease and can be vertically reinforced to build strong, durable structures. However, there are some tips and tricks that make installation easier and faster.
This is not a complete guide on how to install with Interbloc, for more information on this please get in touch and we’ll send you the installation guide.
Preparation & Foundation
Clear and easy access to quick unloading
Make sure there is a clear area to unload and install your blocks. Standard Interbloc blocks have a footprint of 0.72m/2 and can be stacked three high. Place the blocks you’ll need first [i.e. flat bottoms] near the front of the stack.
When you’re ready to install, make sure you have the blocks you need near the site of installation. This will make it much easier for you as you won’t be spending as much time getting blocks.
If installing the blocks inside a building and using vertical reinforcing in a wall think about what’s above the wall - fixing kit main bars need clear space equal to the height of the wall to be installed.
Foundation Prep
If you are pouring a concrete slab allow 6mm creep for each block.
It is crucial that you lay a level foundation. If your foundation is not level, it may result in the blocks not fitting together with ease, causing a redesign, longer installation times, and a higher cost to you.
In the event that you have isolated areas of unlevel ground during installation use shims to pack to height.


Placing the first layer
Getting the base layer correct is vital for the ease of placing blocks on higher layers. Run a string line along the length of the planned walls. Use a level to ensure the blocks are sitting correctly in both horizontal directions.
It's critical to ensure the blocks are spaced correctly on the base layer, this will prevent binding in the blocks on higher levels. The gap between the outside edge of the interlocking sheer key should be 747mm (give or take a 1mm either way). This will result in a 3-6mm gap in each block.

The remaining layers
Before you start interlocking blocks, make sure you dust off debris of the lower layer. Debris can cause an uneven surface when interlocking blocks. This can make it difficult to align blocks perfectly and will affect subsequent interlocking layers.

Fixing Kit tips
When using vertical reinforcement in a wall mark out the placement of the fixing kits first. To allow for creep in the blocks the distance from one kit to another should be 603mm. Mark, drill, and install a maximum of 20 starters bars at a time before installing the base layer. This will allow you to recalibrate
Unless otherwise specified in the design, the location of the starter bars should be a minimum of 300mm from the nearest edge of the concrete foundation.
The space between each hole is a minimum of 603mm for 600 series blocks this allows for creep in blocks as the blocks are placed.
If the wall requires more than 20 holes, at the 21st hole recalibrate your measuring tool to ensure accuracy.
Interbloc suggests the use of Chemset™ C8 Extreme or Hilti® HIT-RE 500 epoxies.

Comments will be approved before showing up.